Black pepper isn’t just the most widely used spice on the planet; it’s a tropical climbing vine with a surprisingly manageable growth habit, even for home gardeners.
Whether you want to harvest your peppercorns for cooking or just enjoy growing something a little more exotic, cultivating Piper nigrum is a rewarding project. The best part? You don’t need a spice plantation in India. With the right setup and care, you can grow black pepper at home, in a pot, a greenhouse, or even a sunny room.
This guide breaks it down into five practical, focused steps that walk you through the entire process: from choosing the right plant to harvesting your very own peppercorns. No fluff, no filler — just the info you need to make it happen.
Let’s get into it.
Step 1: Choose the Right Environment and Variety
Black pepper is native to the tropical rainforests of southern India, so it thrives in hot, humid conditions with filtered sunlight and rich, well-draining soil.
That means unless you live in a tropical climate zone (USDA Zones 11-12), you’ll need to simulate those conditions at home. A warm greenhouse or a sunroom is ideal, but even a large sunny window with consistent indoor temperatures (above 65°F / 18°C) can work.
Humidity matters more than most realize; dry air will stall growth. Use a humidity tray or humidifier to keep the air moist around the plant, especially in winter.
When it comes to soil, think loamy, airy, and rich in organic matter. A mix of potting soil with compost and a handful of sand or perlite will provide the drainage and nutrients pepper vines love.
Avoid clay-heavy or compacted soils, as they hold too much moisture and suffocate the roots. The plant also prefers slightly acidic to neutral soil (pH 5.5 to 7). Check the pH with a test kit and adjust if needed using soil amendments like peat moss or lime.
As for choosing a variety, Piper nigrum is the true black pepper plant. Don’t confuse it with “peppercorn trees” (Schinus species), which aren’t actually related. Look for rooted cuttings or starter plants from reputable nurseries — seeds are notoriously slow and unreliable. Buying a live plant or an established cutting gives you a huge head start and avoids a year-long wait for germination that might never pay off.
Step 2: Plant It Right and Set Up for Support
Once you’ve got your pepper plant and the right pot or spot picked out, it’s time to plant. Black pepper vines grow long, up to 10 feet or more, but they don’t sprawl like tomatoes or cucumbers.
They’re climbers, and they need a vertical support to thrive. Use a sturdy trellis, moss pole, bamboo stake, or even a small wooden lattice to mimic how the plant would naturally wrap around trees in the wild. Place the support in the pot or planting hole before adding the plant to avoid disturbing the roots later.
Plant your black pepper vine at the same depth it was growing in its original container. If you’re growing in a pot, choose one that’s at least 12 inches deep and wide, with drainage holes at the bottom.
Container growing gives you control over the environment and makes it easier to move the plant indoors when temperatures drop. After planting, water thoroughly and allow excess water to drain. From here on, keep the soil consistently moist but never soggy — overwatering is a common killer of young pepper plants.
Mulching around the base of the plant helps retain moisture and keeps the roots cool. Use organic mulch like bark chips, straw, or coconut husk fibers. As the vine starts climbing, gently tie it to the support structure using soft ties or twine.
Avoid plastic ties or anything that could cut into the vine as it thickens. Keep an eye on how it grows — this isn’t a fast-grower, but steady progress means it’s happy.

Also Read: Can You Compost Citrus Peels? Yes, with These 8 Must-Know Tips
Step 3: Care and Maintenance – Watering, Feeding, Pruning
Watering black pepper properly means striking a balance between “moist” and “not wet.” The plant hates standing water, but also won’t tolerate drought. Water when the top inch of soil feels dry, and reduce watering in the winter when growth slows.
If you’re growing indoors, be especially mindful of dry central heating, it can lower humidity and cause leaf drop. Misting can help, but a small humidifier or tray of water with pebbles under the pot is even better. Black pepper likes consistency more than anything.
Feeding is key to a productive plant. Start feeding about six weeks after planting using a balanced liquid fertilizer — something like a 10-10-10 NPK ratio, every two to four weeks during the growing season (spring through early fall).
Black pepper is a light but consistent feeder. In tropical conditions, it grows year-round and appreciates year-round feeding, but in temperate homes, you can cut back in winter. Organic options like fish emulsion or compost tea also work well if you prefer natural inputs.
Pruning helps shape the vine and encourages bushier growth. Start pruning once the plant has developed a few feet of growth. Cut back any overly long or weak stems, and remove dead or yellowing leaves regularly.
This keeps airflow strong and reduces pest risk. You can also pinch off the growing tips of vines to encourage branching. If you’re training the vine vertically, guide new growth by tying it gently to the support and trimming off lateral shoots that get too unruly.
Step 4: Pollination and Flowering
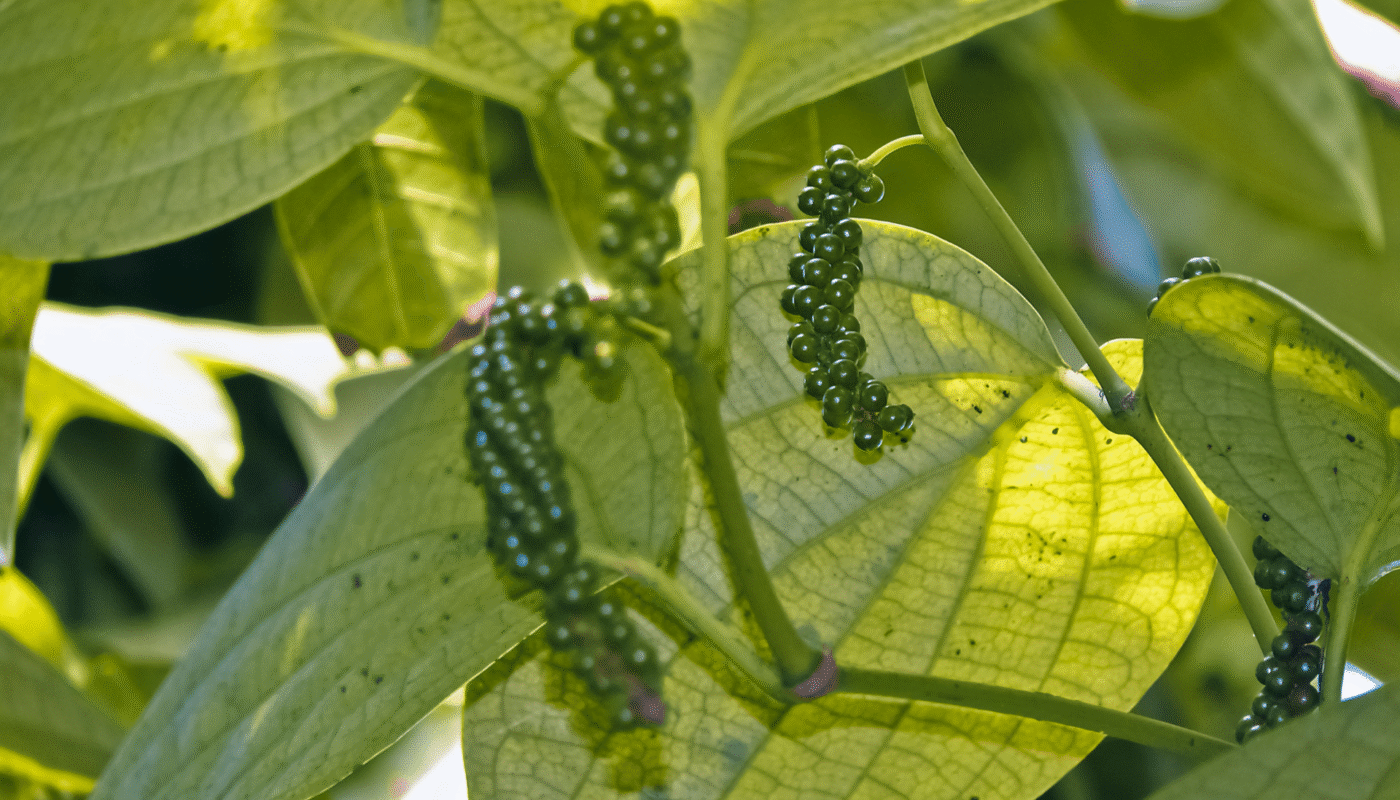
Black pepper plants start flowering when they’re mature, usually in the second or third year after planting. Each spike can produce 50-100 small white flowers, which eventually turn into green peppercorns.
The plant is self-fertile, meaning it doesn’t need a second plant to produce fruit. However, it does need the right conditions: warm temperatures, high humidity, and stable care. If your plant hasn’t flowered after 2-3 years, chances are it’s missing one of those elements.
For indoor growers, hand pollination can improve fruit set. Use a small brush or your finger to gently transfer pollen between flowers on the same spike. You don’t need to pollinate each flower; brushing over the entire cluster a few times every day while the plant is in bloom is usually enough. Outdoors or in a greenhouse, insects and airflow can do the job naturally. Either way, keep the plant well-fed and watered during flowering to support fruit development.
Once the flowers are pollinated, you’ll see tiny green peppercorns form along the spike. Over time, these swell and ripen. If you want black pepper, harvest the berries just as they start to turn red and dry them quickly. For white pepper, fully ripen the berries to red, then soak and peel them. For green pepper, pick immature berries and use or preserve them right away. The plant will continue producing for many years if cared for well.
Step 5: Harvesting and Drying
The moment you’ve been waiting for comes when those clusters of berries—peppercorns are ready to pick. This usually happens about six months after flowering. You’ll know they’re ready for black pepper when a few start turning from green to red. Don’t wait too long, they’ll ripen unevenly, so pick clusters as they start to change. Clip off the whole spike using scissors or pruners.
To process black peppercorns, boil the fresh berries in water for 5–10 minutes. This softens the outer skin and begins the drying process. Spread them out on a clean tray or mesh screen in a well-ventilated area, or use a food dehydrator until they’re completely dry and wrinkled. This can take several days.
The drying darkens the outer layer, giving you the classic black peppercorn look. Store your dried peppercorns in an airtight container away from light and heat.
If you’re after white pepper, wait until the berries are fully red. Soak them in water for a few days to loosen the skin, then rub it off and dry the pale seed inside. Green pepper is harvested early and either used fresh, brined, or freeze-dried. Whatever variety you go for, harvesting your own pepper isn’t just satisfying — it gives you flavor you’ll never find in store-bought spice jars. Homegrown peppercorns pack more punch, and you know exactly where they came from.
Final Thoughts
Growing black pepper at home is equal parts patience and precision. It’s not the fastest crop to mature, but once it’s up and running, it rewards you with beautiful vines, fragrant flowers, and a personal stash of one of the world’s most beloved spices. You don’t need a tropical plantation or acres of land. Just the right environment, consistent care, and a willingness to learn.

It’s a long-haul plant, more like growing a fruit tree than a tomato, but that’s part of the appeal. It becomes part of your space, something you care for and learn from over time. And once you’ve harvested your first batch of peppercorns, the satisfaction hits differently. You’ll never look at a pepper grinder the same way again.
Take it one step at a time. Set it up right, give it what it needs, and enjoy the process. You’re not just growing a plant, you’re cultivating flavor.
FAQs
Can I grow black pepper from seeds?
Yes, but it’s slow and unreliable. Pepper seeds have a low germination rate and can take months to sprout. For best results, start with a rooted cutting or young plant from a nursery.
How long does it take to get peppercorns?
Usually 2 to 3 years after planting. The plant needs to mature before it flowers and fruits. Once it starts producing, it can yield peppercorns twice a year with proper care.
Can I grow black pepper in a pot?
Absolutely. It’s one of the best ways to control temperature, humidity, and soil. Just use a large enough container (12+ inches) and provide a strong support for the vine to climb.
Does black pepper need full sun?
Not direct sun all day — it prefers bright, indirect light or dappled sunlight. In hot climates, full afternoon sun can scorch the leaves, so filtered light works better.
Is black pepper a perennial?
Yes. It’s a tropical perennial vine that lives and produces for many years with proper care. In cold regions, bring it indoors over winter or grow it year-round in a greenhouse.